Sunday, December 12, 2021

Let It Snow with Crafter's Edge


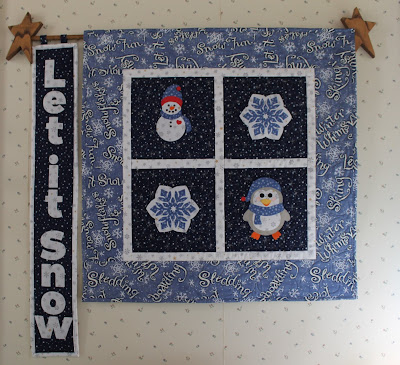
My Crafter's Edge Design Team project for December is called Let It Snow.
This little wall hanging is about 30 x 30".

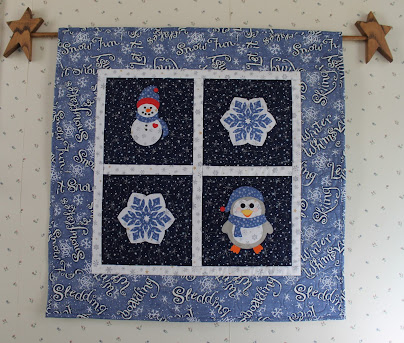
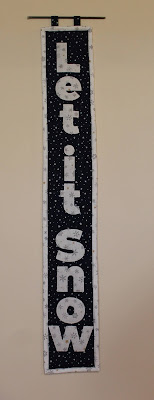
I made a companion piece too.


These 2 pieces use several dies from Crafter's Edge--a few are pictured below.


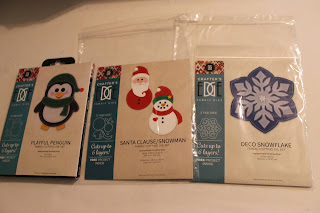
In addition, I used the 1 1/2 inch strip die, and all those letters you see in "Let it Snow." :)

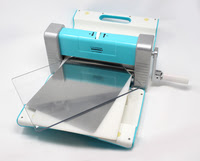
All these shapes are easy-peasy to cut with this wonderful Crossover II machine:


Here's another look at the individual blocks:


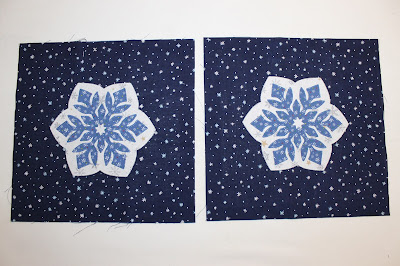
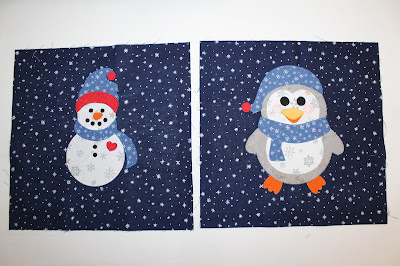
I used one of the blanket stitches on my Janome 9400 to applique the pieces--all but the little black dots on the snowman and the little stars in the middle of the snowflakes--I left those alone.

It's pretty cool that the same dies for the snowman can be used for Santa. Santa's beard is Santa's and the snowman's hat! Some designer was pretty clever!

I was actually hoping the "Let it Snow" would be attached to the bottom of the first wall hanging, but that would have made the hanging a lot bigger than I wanted it to be, so I kept it as a separate banner, if you will. I'm not sure if I'll ever hang them side-by-side, but here's what that might look like:


Thanks, Crafter's Edge, for letting me on the 2021 design team!
It has been a wonderful experience that I hope will continue next year!


Thursday, December 9, 2021

Virtual Cookie Exchange--Fudge???


I am sharing about making fudge for this Virtual Cookie Exchange blog hop hosted by Carol of Just Let Me Quilt. 
Fudge, you say? I know, fudge and cookies are not the same, but our church women make lots of candy for the Christmas season, and this year, I needed to make the fudge. Now, I am not a fudge-eater, but anything for the cause, right?
And it was simple enough.
Here are the ingredients:
sugar, marshmallow creme, evaporated milk, vanilla, chocolate chips, and butter.
(Recipe to follow)

First, line a 9x9" pan with foil--saves cleanup and also helps with cutting the fudge.


Put the sugar, milk, and butter in a pan and cook, stirring constantly.


After it has cooked enough, up to soft ball stage, remove from heat, add chocolate chips and 


marshmallow creme, stirring until all is melted and mixed well. If it were up to me, I would add nuts at this point too, but when we sell to the public, we do not add the nuts.


Then add the vanilla and stir until it is mixed in.


Pour into the pan and let it set up well.


Then you can pull the entire block of fudge out of the pan, using the foil and cut into the size pieces you want. (I should have taken a photo of that part, but I did not.)
I cut mine into one inch pieces. 


My all time favorite candy to make is peanut clusters, and even though this a not a "pretty" picture of them, here are some I made, just Ghirardelli dark chocolate melting wafers and peanuts. YUM!!!


Fantasy Fudge

 3 cups sugar

¾ cup butter or margarine

2/3 cup evaporated milk

12 oz Baker’s semi sweet chocolate, chopped (12 oz chocolate chips)

1-7 oz jar marshmallow crème

1 cup chopped walnuts

1 teaspoon vanilla

Line 9-inch square pan with Reynolds Wrap® Aluminum Foil, with ends of foil extending over sides. Bring sugar, butter and evaporated milk to full rolling boil in 3-qt. saucepan on medium heat, stirring constantly. Cook 4 min. or until candy thermometer reaches 234°F, stirring constantly. Remove from heat.

Add chocolate and marshmallow creme; stir until melted. Add nuts and vanilla; mix well.

Pour into prepared pan; spread to cover bottom of pan. Cool completely. Use foil handles to lift fudge from pan before cutting into 1-inch squares.

Merry Christmas and Happy Holidays to all!

Here is my Christmas wall hanging from Shabby Fabrics Year in Words:

(For whatever reason, my edited copy was not saved... !!!)


*****

Here are the rest of the wonderful bloggers this week--be sure to check them out!


Friday, November 19, 2021

Grandmother's Fan with Crafter's Edge


Finally, my November Crafter's Edge project!
I had the blocks done before the first of November, but could I get the rest of it done that soon--not a chance!
I'm pleased to finally have finished it this very morning!
This uses the Grandmother's Fan die set from Crafter's Edge.
There are 2 sizes in the set, and I decided to use both.

Here is one block:

I originally thought I would make the larger fan only, but the negative space on the opposite corner seemed to be begging to be filled, so I put the smaller one there. I was surprised to need so many blades on the smaller one, but they are a lot skinnier than the bigger blades, so...duh!
The fabric I used was Snow Much Fun by Deb Strain for Moda. It's several years old, and I had used much of the fat quarter bundle for a quilt. I thought I'd use leftovers for this table runner.
Since I was using scraps, I didn't have enough green for an inner border, so I made a flange instead. Below is how NOT to put a flange on with the outer border.


Jack the Ripper and I took out those stitches, and I redid the flange:


That's better.
Oh, yes, and I had to use a sort of scrappy outer border since I didn't have enough of any one fabric...
Next was quilting the thing:


Here's a closeup of the quilting, although it's still not very visible:


The border is a loop to loop design (one of my favorite border designs), and when I decided how to top stitch the binding, I didn't realize that my chosen decorative stitch matched the quilting until I was about 2/3 around the binding. Serendipity!
You can see the binding is very scrappy--less and less of these fabrics to be found!


Here it is on my ironing board. It's kind of big: about 17 x 58".


The Crossover II made cutting the fan blades and quarter circles very easy.


Thanks, Crafter's Edge for the opportunity to be on the Design Team!!
I recommend this die cutting machine and all the dies to everyone. They are very helpful!

Happy Thanksgiving!


Wednesday, November 17, 2021

No Ring--My Turn


This is my day to share on the No Rings hop hosted by Carla of Creatin' in the Sticks.
We've seen some fantastic mug rugs!! I've certainly enjoyed--and been awed by--all that I have seen.

I took the easy way out this time. 😀
I had used part of a panel for another project and had several small parts left. 
"What perfect mug rugs these will make!" I said to myself. (I hope others of you talk to yourself while sewing--don't make me feel all alone in this!)
Sew, gathering some scraps from other projects for the borders, I put together these 3 mug rugs.

I love fall colors and these look great (if I do say so myself) on my oak table and/or anywhere else during this fall season.


For those who like to see FMQ, I used a variegated Madiera Aeroquilt thread that I have used for several years, color 9600, 40 wt. The colors in it are perfect for fall.
I did a leaf and loop FMQ for the pumpkin.

The acorns and leaf were loops.

The berry bunches are meandered.

Those are my projects. It's amazing what we quilters can think of for our scraps and leftovers.
Thanks for looking at my blog!
Don't forget to visit the rest of our bloggers this week!
Here's the entire list, in case you missed some on Monday and Tuesday.